Bitmap Filter Editor
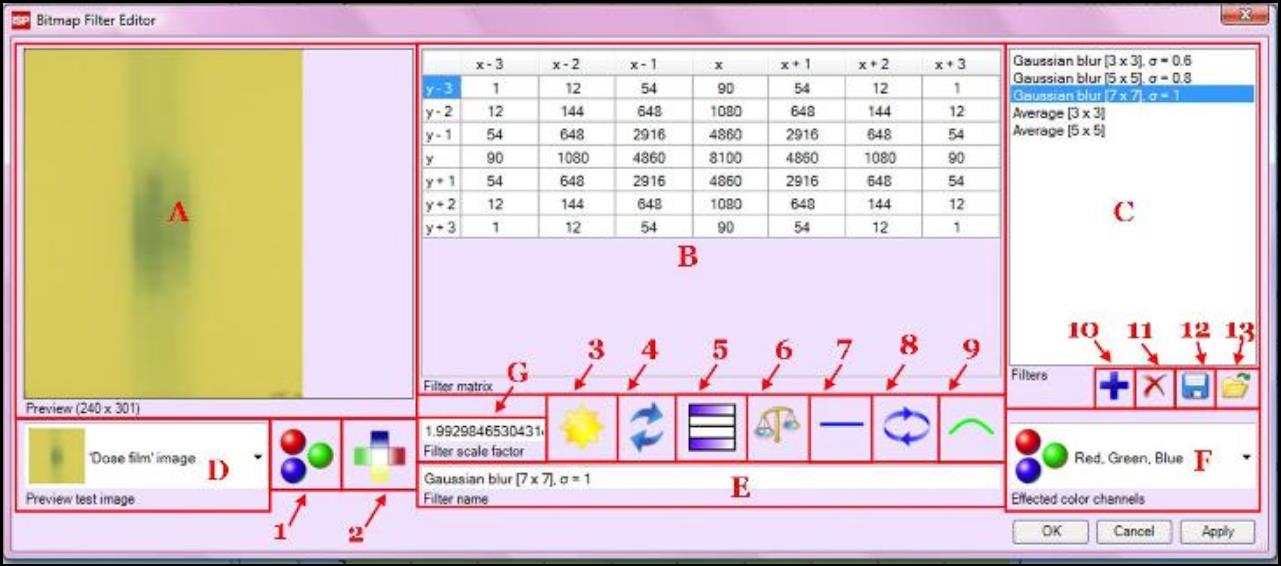
The Bitmap Filter Editor can be located via “Filtering tool” in the “Image Panel.” It allows you to create, edit, and delete filters applied to the image viewing.
- The “Preview” panel allows you to view the image before and after the filter is applied. Right click inside the panel to change the displayed color channel and the image size.
- The “Filter matrix” allows you to enter factors into matrix M, which describes the image filter transition. For the effected color channels the new color C is calculated by
 where C(x,y) is the new color value at pixel coordinate (x,y),
Scale Factor is the “Filter scale factor” entered in box G,
M(x,y) is the number entered in “Filter matrix,”
and c(x,y) is the old color value at pixel coordinate (x,y).
- Right click inside the matrix to change the configuration of the table.
- The “Filter list” panel allows you to view, select, and delete filters on the list.
- The “Preview image selector” drop down list allows you to select image viewed in the “Preview” panel, A, to test and preview filter effect.
- The “Filter name” window allows you to view or change the name of filter selected or enter name for new filter created.
- “Effected color channels selector” allows you to select the color channels that are affected by the image filter applied.
- Displayed color selector” button allows you to select the displayed colors and effects in the test image in “Preview” panel, A. Please note that the selection does NOT affect the filter properties but changes how the test image is displayed only. The icon appears as
 when the test image is grayed and changes to
  when inverted. To turn off all the effect and change the view back to all three color channels on, click on the icon and select “Normal view.”
- Click on the icon to turn filter on and off on the test image in “Preview” panel, A. The icon appears as
 when the filter is turned on.
- Select “New” to start a new filter and reset filter values to default.
- Select
 to redo last undo action. Select
  to undo last change of the image filter.
- Click on the icon to modify size of the filter matrix and to change the filter range in vertical and horizontal direction.
- The “Balance” button allows you to balance filter matrix by normalization. Click on the button and select
- “Normalize factor*
 = 1” to change the filter scale factor in box G to one over the sum of matrix values.
- “Normalize factor*
 = 1” to change the filter scale factor in box G to one over the absolute sum of matrix values.
- The “Filter edge mode” allows you to approximate the missing pixel color at the edge of the image. Click on the icon to select one of the mode: · “Constant extrapolation” uses last pixel value to approximate pixel beyond the image edge. · “Bi-linear” uses linear approximations of pixel values both in horizontal and vertical direction to approximate pixel beyond the image edge. · “Bi-quadratic” uses quadratic approximations of pixel values both in horizontal and vertical direction to approximate pixel beyond the image edge.
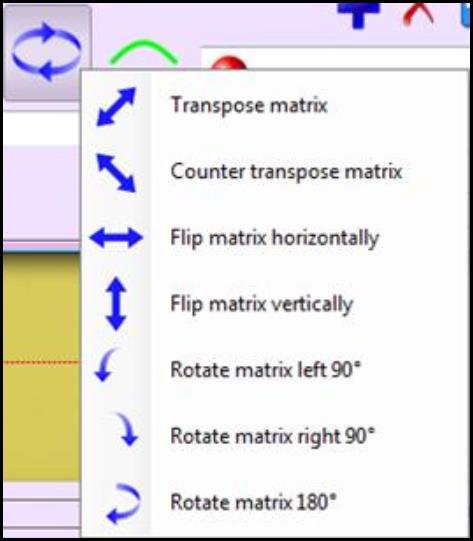
- The icon allows you to modify filter matrix by flipping, transposing, and rotating.
- The icon displayed identifies the filter selected. Click on the icon to change the filter icon from file.
- The “Add” button allows you to add current filter on to the “Filter list” panel, C.
- The “Delete” button allows you to delete selected filter on the “Filter list” panel, C.
- The “Save” button allows you to save the filter list on the “Filter list” panel, C.
- The “Open” button allows you to open the filter list saved from file.